For full details, options and buying information, click here.
As rarely sighted as rocking horse poo, a 1.25″BSP immersion heater has a circumference of 131 mm and a diameter of 42mm, thus it is only possible to fit 3 x 8mm U bent elements and 1 stat pockets onto the screwplug, and thus it could be a Single or Three Phase immersion heater, 1-27kW. It is not possible to loop the elements to reduce the watt density, as the resulting element bundle would not fit thru the hole.
If you are unfortunate enuf to be tied to 1.25″BSP, call Jamie on 01827 215684 to discuss your requirements.
The smallest screwplug immersion heater I have ever sold, and as rare as a pile of Rocking Horse Sh1t, a 1″BSP Immersion Heater comes with some serious limitations
With a circumference of 104 mm and a diameter of 33mm, it is only possible to fit 2 x 8mm U bent elements and 1 stat pocket onto the screwplug, and thus it would have to be a Single Phase immersion heater.
Full details can be found here, and if you wish to discuss a design & purchase of a bespoke item, look here, then call Jamie on 01827 215684.
The domestic standard screwplug size here in the UK, 1.5″BSP Immersion Heaters are not our stock in trade, 2.25″BSP heaters are, but we can do 1.5″ to your exact specifications in a coupla weeks leadtime.
With a circumference of 150 mm and a diameter of 48mm, it is only possible to fit 3 x 8mm U bent elements and 2 stat pockets onto the screwplug, and thus it could be a Single or Three Phase immersion heater. It is not possible to loop the elements to reduce the watt density, as the resulting element bundle would not fit thru the hole.
With these inbuilt limitations, and a host of folks selling cheap, one element, massive watt density heaters online for peanuts, I often advise potential customers to go buy something cheap, not cos I want to live in a disposable society, but my stuff is heavy industrial gear which is not going to come cheap. It could cost 10 times as much as some of the heaters I have seen, but I cannot in all good faith tell you it will definitively last 10 times as long. Particularly when people are proving a theory or application, do it on the cheap, I would, cos I’m half Scottish, Half Jewish & half Yorkshireman. But live in Sunny Tammuff.
Full details and buying guide can be found on our webpage here.
Call Jamie on 01827 215684 to discuss your 1.5″BSP needs, so we can co-design the best heater for your application.
###PLEASE NOTE, 2.25″BSP MEASURES 2.5″ or 65mm ACROSS THE THREADS.###
###206mm circumference – use a bit of string/cotton###
Call Jamie on 01827 215684 to discuss your needs.
Not necessarily the biggest, but certainly the best & most common, 2.25″BSP Immersion Heaters are our stock in trade. As the industrial standard in the UK, most people want 2.25″ so that is what we keep on the shelf. As 2.25″ accommodates 3 elements, and thus can be Single or Three Phase, stock is basically the 3 times table, 3, 6, 9, 12, 18, 24 & even a 27 if needs must.
Full details and purchasing options can be found here, but basically…
With a circumference of 206 mm and a diameter of 65mm, it is possible to fit 3 x 8mm LOOPED elements and 2 stat pockets onto the screwplug, and thus it could be a Single or Three Phase immersion heater.
Available at any kW loading from 1000w up to 27kW.
2.25″”BSP available in brass and Stainless Steel 316.
Available with 2 thermowell at 7, 11 or 18″ for thermostats / cutouts.
2 M25 cable entry glands as an option.
Available with no thermowell if specified by the client. If you don’t need it, omit it from the build, as it is an unecessary weak point.
Use 2.25″BSP weld bosses, as it is the industrial standard and more available off the shelf.
If you are one of that rarest of breeds, the Rich Brewer, you can go for DN80 or even DN125 hygenic connections, which allow you to remove the heater fairly quickly and easily for cleaning purposes. BlogPost to follow when time & life allows, but in the meantime, have a shufti here – Removeable Brewery Heaters
Heat rises, put the entry ports low, then it’ll agitate itself to a degree.
BONUS ITEM – if heaters are low in the vessel, you can switch them on as soon as they are covered with water, heating a small volume of water, which has gotta be a good idea and save a fair chunka time, no?
Don’t position the entry ports on the same level, as this will cause elements to clash in middle when inserted.
How not to do it – (2.5″, in the belly not the bottom, clashing like jousters)
A better job –
Any suggestions, input, constructive criticism, etc, greatly appreciated.
I started a post about my BI18 Brewery Immersion Heater, which rapidly twisted to being about “The Holy Grail of Brewing – Easy Clean Immersion Heaters”, so I shall replicate here in a seperate post, in the hopes of finding more collaborators via serendipity & G##gle’s algorithms.
This is something I have been playing at and toying with for years, which now deserves some serious focus and attention. If we can work together to improve the unfortunate end to the otherwise beautiful brewing day, life will be better, brewers will be happier, hangovers will be shorter, tax will be lower, politicians will be honesterer…..
Here is my friend Alex from the Green Duck Brewery in Sunny Stourbridge using one for a guitar solo. Worry not, it’s not plugged in! Mind you, neither is he.
Having spent a little time with Alex & Nathan brewing, trying to learn as much as I can about the process to be better able to understand & problem solve, two things struck me.
Firstly, banging heavy rock music is a subtly essential part of this process.
Secondly, the worst part of the day is the last part of the process, cleaning that awful grey sludge off the elements, in a process that I think Nathan refered to as “Winking the Elephant” whatever that means?
This involves some serious welly trouser type things, 3M Scotch green scouring pads & wire wool, and an awful lot of elbow grease & swearing. To have that “Turd in the Swimming Pool” of a job hanging over your head all day, somewhat spoils an otherwise pleasurable, if damp, day.
So I have made it my mission, my Holy Grail, to make this better, to remove said turd from the horizon. I’m not clever enuf on my own, so let’s Collaborate. Please call or email me with mad ideas from other areas of industry or applications, share ideas you have tried that failed, & why, or just to tell me how you do the cleaning process. I have spoken to Brewers cleaning with acids, lemon juice, caustics (FFS, NEVER USE CHLORINATED CAUSTIC! Nameless Brewery did, shiny new heater very dead inside a month), but surely the prize for Best in Show thus far, albeit with an expensive DN80 removeable Heater, goes to Nial Fitzgerald at Stone Barrel Brewing in the Emerald Isle for this inspired creation of purest beauty…
My Collaborator In Chief, Dave, and I had visions of shiny stainless steel tubes, munsen ringed to a wall, sold for huge sums of money to that rarest of breeds, the rich & shiny obsessed brewer. And Niall goes and achieves the same easy cleaning with a bit of drain pipe & some gaffer tape! I love it! Basically, the idea is to take the heater out of the vessel, (intermittently or every brew is question 1), soak it overnight in ???, then jetwash/steamclean the bugger off in the morning. Hopefully with nonchalant ease.
My first question to anybody brave enuf to read this far is, what precludes the same thing from being done with a screw in (considerably cheaper) heater such as my BI18 fan favourite, with which this ramble started, way back when?
If it is the faff of disconnecting power, could one of these not be fitted?
The only other idea currently percolating around my head is this…
A heater with elements bent in such a way as to allow flexing for insertion/removal, supplemented by possibly a cleaning block with the correct sized holes to clamp a scouring pad around the 2 legs of the element. To facilitate easier winking 😉
Alex the Guitarist, above, is a willing volunteer & test pilot, but many heads make light work, and I want to build Win-Win relationships with as many folks, particularly brewers, as possible. So, gissa call on 01827 215684. Cheers, Jamie.
It is good value for money, at a tickle under £300 (and if you call me on 01827 215684 and say BLOGPOST, BABY! you will receive a healthy discount) and at a tickle under a meter in immersed length, it is a good fit for most vessels.
The BI18 benefits from –
10mm diameter Incoloy 800 elements, with huge great wide open spaces between elements for cleaning purposes
2.25″ BSP Brass Screwplug (suits 95% of brewers, SS bespoke II Range available for other 5%)
Here is my friend Alex from the Green Duck Brewery in Sunny Stourbridge using one for a guitar solo. Worry not, it’s not plugged in! Mind you, neither is he.
Having spent a little time with Alex & Nathan brewing, trying to learn as much as I can about the process to be better able to understand & problem solve, two things struck me.
Firstly, banging heavy rock music is a subtly essential part of the process.
Secondly, the worst part of the day is the last part of the process, cleaning that awful grey sludge off the elements, in a process that I think Nathan refered to as “Winking the Elephant” whatever that means?
This involves some serious welly trouser type things, scotch green scouring pads & wire wool, and an awful lot of elbow grease & swearing. To have that “Turd in the Swimming Pool” job hanging over your head all day, somewhat spoils an otherwise pleasurable, if damp, day.
So I have made it my mission, my Holy Grail to make this better, to remove said turd from the horizon. I’m not clever enuf on my own, so let’s Collaborate. Please call or email me with mad ideas from other areas of industry or applications, share ideas you have tried that failed, & why, or just to tell me how you do the cleaning process. I have spoken to Brewers cleaning with acids, lemon juice, caustics (FFS, NEVER USE CHLORINATED CAUSTIC! Nameless Brewery did, shiny new heater very dead inside a month), but surely the prize for Best in Show thus far, albeit with an expensive DN80 removeable Heater, goes to Nial Fitzgerald at Stone Barrel Brewing in the Emerald Isle for this inspired creation of purest beauty…
My Collaborator In Chief, Dave, and I had visions of shiny stainless steel tubes, munsen ringed to a wall, sold for huge sums of money to that rarest of breeds, the rich & shiny obsessed brewer. And Niall goes and achieves the same easy cleaning with a bit of drain pipe & some gaffer tape! I love it! Basically, the idea is to take the heater out of the vessel, (intermittently or every brew is question 1), soak it overnight in ???, then jetwash/steamclean the bugger off in the morning. Hopefully with nonchalant ease.
My first question to anybody brave enuf to read this far is, what precludes the same thing from being done with a screw in (considerably cheaper) heater such as my BI18 fan favourite?
If it is the faff of disconnecting power, could one of these not be fitted?
The only other idea currently percolating around my head is this…
A heater with elements bent in such a way as to allow flexing for insertion/removal, supplemented by possibly a cleaning block with the correct sized holes to clamp a scouring pad around the 2 legs of the element. To facilitate easier winking 😉
Alex the Guitarist, above, is a willing volunteer & test pilot, but many heads make light work, and I want to build Win-Win relationships with as many folks, particularly brewers, as possible. So, gissa call on 01827 215684. Cheers, Jamie.
Regularly our most consistent seller, but not entireley sure why this is over other power ratings, a 6kW immersion heater obviously suits many industrial applications.
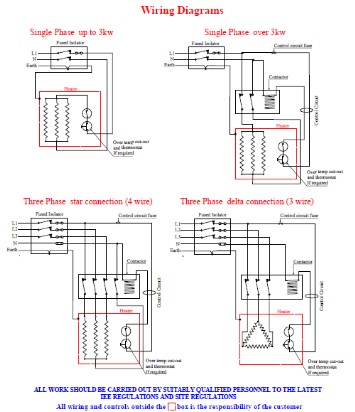
The popularity could be down to the fact that, with the correct wiring, fuses, etc, you can get away with 6kW on a Single Phase feed, or as it houses three elements, it is also fine for a Three Phase feed. If the heater is wired 4 WIRE STAR, it can even be reconfigured to single phase by shifting ther busbars around, but that is clever stuff, for cleverer folks than me. If you are sufficiently intrigued, the images on this page will hopefully show this theory in practice.
It could also be down to the immersed length at 20″/500mm or below being a good fit for many liquid vessels. Some customers fit multiple 6kW heaters into a vessel as a bank of heaters, rather than fit an 18kW immersion heater, at about twice that length.
This may also effect the control side of things, with an 18kW immersion heater consisting of 3 x 6000w elements, whereas our friend the 6kW heater has 3 x 2000w elements. Some customers switch entire heaters in a bank on /off for temperature control purposes, some cleverer folks switch phases of just one heater on/off. Others use thyristor control, which basicaly varies the voltage, dialing up & down the power to fine tune temperature.
Insider Knowledge, you can put any voltage thru an element & get proportionally more or less power.
Thank you for visiting, & kudos to you for reading this far. If you have any feedback, suggestions, etc, please feel free to contact me.
Anyone limited to a 240v Single Phase supply, as most domestic situations are, must buy a Single Phase Immersion Heater. These will by necessity be limited to 3kW under normal household circumstances, or 6kW if you have 32 amp wiring, fuses, etc.* If you are reading this & are clever and wish to educate me so I am able to elaborate further, feel free on 07897 246 779 or immhtr at gmail dot com)
If you buy something on a budget, you are likely to get one element on a screwplug, thus you attatch live to one terminal, neutral to the other, and away you go (unless you have a control/cutout stat, but lets keep things simple here & now. If you want complicated, there is a wiring diagram HERE). The downside to the financially economical (cheap) option is that it is likely to have a really high watt density (explanation for normal people HERE , but if you are one of that rare & special breed, THE BREWER, click HERE).
Put simply the more heating power coming out of every square inch or cm of your hot element, the higher the sheath temperature, the more sh1t sticks (calcium & magnesium in our gloriously hard water) and the more any chemicals, acids/alkalis, etc, in your solution will attack the glowing element, and cause it to go pop, sooner rather than later. I sometimes advise customers to follow this disposable route, which is fine if you are proving an application, limited on budget, etc.
But if you want to (hopefully) fit & forget, you will have to spend a little more money on a 3 element Single Phase Immersion Heater, like our Industrial Immersion Heaters Range at 3kW or 6kW or our Brewery Immersion Heaters Range at 3kW or 6kW , or indeed any of the Oil Immersion Heaters Range. 3 element terminals will be linked with busbar to provide a common connection for the LIVE line, and similarly the other 3 terminals will be “commoned” up with busbar to provide connection for neutral. As below, in images I immediately feel the need to apologise for. Sorry.
3 elements will allow the watt density to be chopped into thirds. For example a 3kW heater with 1 x 3kW element, or a 3kW heater with 3 x 1kW elements (If the immersed length & element shape are the same. (It’ll last longer. How much longer? 3 times longer? Who knows? Certainly not me. But surely logic dictates? Only if you are a Vulcan). Which leads me on to U bent or looped elements. On a 1.5″BSP screwplug (Domestic Standard in UK) it is only possible to fit 3 U bent elements (8mm ⌀ , and a coupla stat pockets if you know an ElementJedi) whereas on a 2.25″BSP screwplug (Industrial Standard in the UK) you can fit looped elements, as below.
This enables even more element to be fitted into the space available. Which is why I often annoy customers by insisting on the “MAXIMUM immersed length”. An extra inch (Matron!) on 3 looped element is an extra 6″ of element, which is only gonna extend the working life of your heater a little bit more. So size is important, after all.
We stock the Industrial Immersion Heaters listed below for rapid delivery, but can make bespoke items to suit your specific needs if required. In BRASS that can include BSP screwplug sizes including 1″BSP, 1.25″BSP, 1.5″BSP, 1.75″BSP, 2″BSP as well as the British Industrial Standard size of 2.25″, which can be fitted with an adaptor to take it up to 2.5″BSP. In STAINLESS STEEL we can offer 2″ & 2.25″BSP screwplugs.
Bespoke items usually take a coupla weeks, but can be shuffled to the top of the pile if you are willing to pay a premium surcharge of approximately 50%. Customers only tend to do this when they are desperate, due to a production line being down & costing £££’s due to not carrying a spare. The moral of this story being, CARRY A SPARE, especially if your heaters are not standard (ie, 2.25″BSP and a multiple of 3 in terms of kW power output) and stock as listed below.
1.25″, 1.5″, 1.75″, 2″, 2.25″ and 2.5″ screwplug sizes are available in brass.
2″ and 2.25″ BSP also available in stainless steel.
Available with 1 or 2 thermowells at 7, 11 or 18″ for thermostats / cutouts.
1 additional M25 cable entry glands as an option.
Available with no thermowell if specified by the client. If you don’t need it, omit it from the build, as it is an unecessary weak point.
Call Jamie on 07897 246 779 to discus your Single Phase Immersion Heater needs.
*Fair play to you for checking out the footnote, hope it’s worth it? Having said all of the above, I have spoken to many a mad brewer, telling me they are running 12 & 15kW on a single phase, but that is mere rumour & hearsay, and my calls are not recorded for training & quality purposes). Again, if you are clever and can explain htf that is doable, please contact me, explain in small words, and if I can grasp it, we will share it with the world. I love a bit of Collaboration.


